Posted: 4/27/24
The Beast - 4WS Base Camp
Axial SCX10 III with UTB10 Capra Axles
By Matt Higgins
Looking at my collection of crawlers all I see is a bunch of lightweights. Whether built for trails or comps, I clearly favor lightweight rigs. Weight in the right places definitely helps, but, in general, my philosophy is lighter is better. My current Class 2 comp rig, a SCX10 Pro, weighs in at a svelte 5.2 lb. At 5.4 lb., my Top Truck Challenge K10 SCX10 II is only slightly heavier. The latter truck bears the rather unoriginal Heavy Chevy nickname, but it’s not my heaviest 1/10-scale rig. Without officially weighing them all, I’m certain that title goes to my fully-loaded and built-like-a-tank SCX10 III JLU, which is still only 7.2 lb.
Looking to buck my own trend, I wanted to build a beast of a truck, a true heavyweight (at least by my standards). My goal was 8.5 lb., but there’s more to it than that. I wanted a truck that could do it all. Crush rocks, sling mud, climb hills, and pull a scale ton. I wanted a truck that packed a punch like George Foreman. It doesn’t have to be pretty, but it has to hit hard.

I decided my new build would have 4-wheel steering, an old school body, and 4-link. I also wanted some big tires. And, like I said, I wanted it be a heavyweight. I wanted a truck that was a beast. In fact, that quickly became the name for this build. Knowing the boxes that needed to be checked off, I settled on kit smashing an Axial Capra 4WS with a SCX10 III Base Camp. To build this beast right, I planned to throw all the brass and aluminum, that I normally shy away from, at it.
Chassis
One of the best platforms to start any build with is the Axial SCX10 III Base Camp, which is exactly what I selected. Depending on your goal, you can go with the RTR or the kit version. The kit includes the dig unit and standard axles. I knew I’d be swapping axles, so that wasn’t a factor. I wanted dig and I knew I’d be using different electronics, so the kit made the most sense.
It’s pretty easy to spot that I gave the chassis the Rock Pirates RC treatment. I bolted up their popular aluminum Hardline bed, which is technically made for the SCX10 II. To make it work on the SCX10 III frame rails, all I did was carefully measure and drill two new holes in the bed to mount it up. The side mounts unfortunately don’t like up, but the bed isn’t going anywhere. Since I planned to run a Pro-Line Power Wagon body, I used Rock Pirates RC sliders specifically made for this body. These fit perfectly with to the frame and body and provide a finished, factory look. In addition to being black powder coated, the underside of these sliders is smooth, which helps the truck glide over rough terrain that the stock side plates would otherwise catch on.
Running a cab-only body low on the chassis meant I needed to find a new place to mount the battery. The Rock Pirate RC sliders would work, but my go-to battery mount for a Base Camp build is the DSM Off-road Forward Battery Tray. This mount positions the battery across the chassis rails, right in front of the transmission. Granted, the Spektrum 3S 2200 mAh LiPo battery this tray accommodates isn’t the heaviest component, but it does position it low and toward the front. If you’re going to move weight, this is how you want to do it.
To round out the Rock Pirate RC setup, I installed their highly adjustable SCX10 III rear shock towers. These work perfectly with the Hardline bed and are also pretty much indestructible. On of the most popular traits of the Rock Pirates RC shock towers is that they allow you to lay the shocks down for a more progressive feel, which feels softer at first and stiffer as the shock compresses.
I wanted to be able to properly hook this truck up to a pulling sled or take on a tug o’ war, so a hitch was definitely in order. I found a simple machined aluminum option from RCLions that had a good amount of adjustment. Best part is the draw bar is removeable, so when it’s not needed, it’s not getting hung up on rocks. The downside is it’s made for the SCX10 II. All I had to do was slightly enlarge the mounting holes on each side of the metal frame rails.
The stock SCX10 III Base Camp, like the other SCX10 III rigs, uses a 3-link front suspension setup. The UTB10 Capra has a 4-link, which is what I wanted. The problem is the Base Camp skid plate won’t accommodate a fourth link up front. The answer came in the form of a 3D-printed skid plate from Spare-Time Hobbies. This flat skid plate uses aluminum side plates on either side to mount the inner upper links. This setup allowed me to use the Base Camp LCXU transmission and easily mount 4-links front and rear.
Suspension
I was kind of startin’ from scratch here. The first obstacle was figuring out links. What links you need for a conversion like this depends on what wheelbase you want and what body you’re using. On the latter point, running a cab-only gives you a lot more leeway on wheelbase. Instead of using the stock links that came with the Base Camp, where I’d be one link short anyway, I upgraded to the 6 mm links used on the regular SCX10 III platform. The one exception is the rear SCX10 Pro high clearance links I opted for. This rig isn’t exactly going to be a comp crawler, but these will still help on the rocks.

For shocks, I went with Pro-Line Big Bore Scale Shocks. These aluminum threaded body shocks feature a bladder design, X-ring seals, aluminum shock caps, 3.5 mm shafts and captured bottom spring perches. They live up to their Big Bore name with a 10.8 mm bore that holds a lot of shock fluid for smooth, consistent performance. A Rock Pirates RC Servo & Shock Spacer Pack made mounting the shocks easy.
Drivetrain
This is where some big changes took place. The most noticeable change was switching from AR45P axles to wider Capra axles. I took this change even further by installing the Capra axle components in Treal aluminum housings. These metal housings are durable and heavier than stock. My general rule of thumb when adding weight is if it’s added below the motor, it’s good, above the motor, it’s bad. That said, I more than generally favor light rigs, but this truck is purposefully the exception, so these Treal axles were a perfect choice. The machine quality on these axles is great and everything fit exactly as it should. No extra effort was required to use these axles. I kept the stock composite servo mount because I’ve never liked builds where it’s all metal on metal. The composite pieces here and there allow for some give and a better overall feel for the finished product.
On the ends of the axles, I added more Treal parts and even more weight. Instead of aluminum, this time I went with brass components. Not only is this added weight well below the motor, as described above, it’s at the far extremities, which is ideal for stability. Weight at the ends of the axles helps tremendously on off camber side hilling but also improves overall poise and balance. Think of it as walking a balance beam with your arms outstretched compared to crossed over your chest. This is why if you’re going to add brass, at the knuckles is better than, say, at the diff cover. Both are good because they’re below the motor, but at the knuckles is better.
I wanted low gearing for this heavy rig, so I started with a 13-tooth Axial 32-pitch pinion. I also swapped the spur for the bigger 60-tooth spur gear that comes with the SCX10 Pro. A smaller pinion and bigger spur equal lower gearing, which equals more torque and pulling power. I didn’t stop there. In the axles, I swapped in a Vanquish Underdrive Gear Set in each axle. I went with both axles just to get lower gearing. Last, I used Levigo RC Underdrive 14/21 portal gears, again, in both axles. This truck might not win any races, but it’ll pull stumps. The only downside to the previously mentioned larger spur gear is the stock gear cover no longer fits. That’s not ideal, but plenty of rock crawlers, such as the SCX10 Pro, are just fine with exposed spur and pinion gears.
Body, Wheels, & Tires
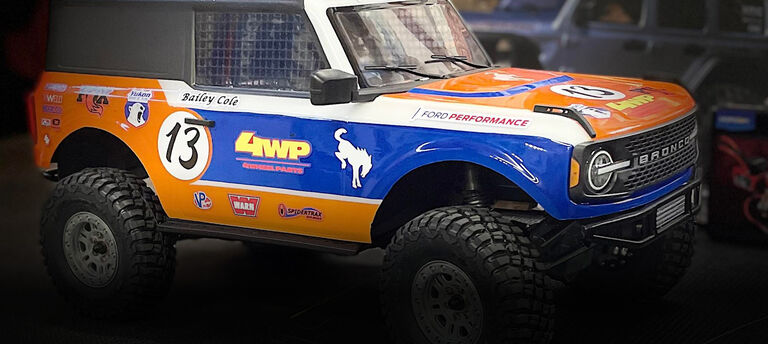
The Pro-Line Power Wagon body is one of the most popular bodies in rock crawling. With the fenders trimmed and an aftermarket bed, it’s ideal for crawling and trails. There are a lot of them out there. To make sure mine stands out, I turned to Bill Zegers of Zegers RC Graffixx for a custom paintjob. He did an amazing job giving the body a weathered old school look. Bill has painted more cover vehicles for RC magazines than any other painter and his experience shows in every body he turns out. I can’t recommend him enough if you want a custom painted body you’ll treasure. To dress up my creation and give it some scale appeal I added scale accessories from Crawler Cult RC, a custom license plate from the RC Plate Shop, and an antenna from Twisted Tree.
To narrow the wide Capra axle stance, I used some Dlux Fab 1.9 High Clearance Wheels specifically designed with a lot of positive offset. These wheels are 3D printed with carbon fiber faces. The 9mm wide offset hubs I used are machined aluminum, so you don’t have to worry about stripping hexes. You can get these as glue-ups or as beadlocks. I opted for the beadlocks, which is a small upcharge.

The first part I added to my wish list when I was dreaming up this build were Pro-Line’s Mickey Thompson Baja Pro X 1.9 tires in Predator compound. Before I knew the body or even what chassis I wanted to use, I knew I wanted to build a brawny truck around a set of these 4.85 in. tall aggressive tires. For foams, I used Pro-Line Dual Stage Foam in the rear and stock foams in front. This is the typical setup I run with the only exception being my comp crawler where I run the Dual Stage foams front and rear.

Electronics
With just front steering duties to take care of most crawlers use a single servo, but with 4-wheel steering, a winch, and dig, this truck needs four servos – four strong servos. As such, I turned to Reefs RC for some overkill electronics. For steering, I’m using Reefs RC 1100 Smart Brushless Servos, front and rear. These feature waterproof aluminum cases, metal gears, and way more torque than even a truck this heavy needs.
My winch is a Reefs RC 300 IS Comp Spec Internal Spool Servo Winch. Waterproof aluminum case, built-in spool, steel gears, and a brushless motor give this servo a ton of pulling power. At 8.4V, it delivers 300 oz. of torque. Reefs RC includes 8 ft. of synthetic line and a scale hook. I opted for their steel hook, which gives up a little scale detail but more than makes up for it in grabbing ability. Originally, I had the 800 IS winch installed, which has a ton of power, but I decided on my timed course, the speed of the 300 version was needed.
To operate the dig unit, I used a Reefs RC 99 Micro Servo, which is so stout that I skipped the servo saver I typically use on dig or 2-speed shifting duties. I have no worries about this little guy burning up.
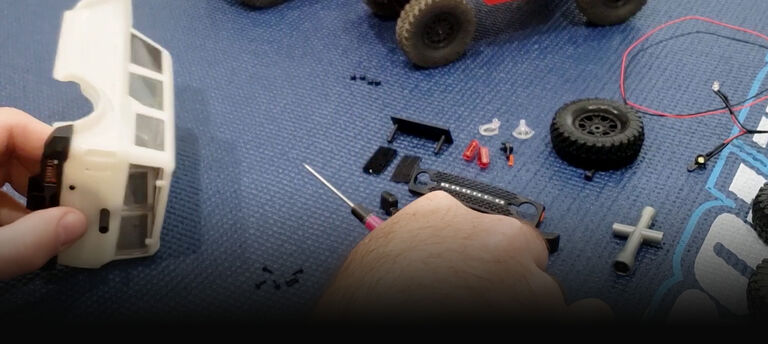
Running the narrow Power Wagon cab and Rock Pirates RC sliders means space for electronics is far less than stock. The easy solution also provides a ton of power. I choose the Spektrum Firma 2300Kv 2-in-1 Brushless crawler setup. This 2-in-1 is a huge space saver and is perfect for many crawler builds from bruisers like my truck to scalers to comp rigs. If you want to save space, have neater wires, and still have a ton of power, check out the Spektrum Firma 2-in-1 systems.

None of this is any good if you can’t control it all, so I went with my new go-to transmitter, the Spektrum DX6 Rugged. I absolutely love this durabletransmitter for crawlers and bashers and it's a perfect fit for The Beast. I matched the Rugged with a Spektrum SR515 receiver.
Parts List
- Axial SCX10 III Base Camp Builder's Kit AXI03011
- Axial Capra 1.9 4WS RTR AXI03022BT2
- Axial Aluminum Servo Horn 25T AXIC0836
- Axial Pinion Gear 32P 13T AXIC0724
- Axial Spur Gear, 60T 32P AXI232075
- Axial Stainless Steel M4 HC Link AXI234043
- Crawler Cult RC Scale Bag
- Dlux Fab 1.9 High Clearance Wheel Fat 6 1.9 High Clearance
- DSM Off-road Forward Battery Tray (Fits Base Camp & K10) 2100
- Levigo RC 14/21T Underdrive Portal Gears MXC923-2
- Pro-Line 1946 Dodge Power Wagon Clear Body PRO349900
- Pro-Line Big Bore Scaler Shocks6343-00
- Pro-Line Dual Stage 1.9” Rock Crawling Foam PRO617400
- Pro-Line Mickey Thompson Baja Pro X G8 Tires PRO1021214
- RCLions CNC Aluminum Adjustable Drop Trailer Hitch Receiver 59868
- RC Plate Shop Custom License Plate
- Reefs RC 99 Micro Servo REEFS25
- Reefs RC 300 IS Comp Spec Servo Winch REEFS123
- Reefs RC 1100 Smart Brushless Servo REEFS119
- Reefs RC Synthetic Winch Line & Steel Hook REEFS45
- Rock Pirates RC Hardline Bed Hardline Bed
- Rock Pirates RC Pro-Line Power Wagon Sliders Power Wagon Sliders
- Rock Pirates RC SCX10 III Rear Shock Towers SCX10 III Rear Towers
- Rock Pirates RC Servo & Shock Spacer Pack Spacer Pack
- Spare-Time Hobbies Axial Base Camp HC Skid v1 (SCX-10iii RTR)
- Spektrum 11.1V 2200mAh 3S 30C Smart LiPo SPMX22003S30
- Spektrum DX6 Rugged 6-Channel DSMR Transmitter SPMR6215G
- Spektrum SR515 DSMR 5-channel Sport Receiver SPMSR515
- Treal Hobby Axial Capra Axles Housing 7075 Front Black X002KS7ZYZ
- Treal Brass Inner Portal Covers Steering Knuckles 60g Black X00324O1Y3
- Treal Hobby Brass Outer Portal Cover 52g Black X002LMAN1R
- Twisted Tree RC Antenna The Fox Tail
- Vanquish Products AR44 Axle Underdrive Gear Set, 33T/8T VPS08331
- Zegers R/C Graffixx custom paintjob
Performance
Before any driving, it was time for an official weigh-in. Drum roll, please. Final weight? 8.26 lb. Okay, that’s not that hefty, but it’s a heavyweight in my fleet. Yes, it’s lighter than some of the rigs I see out there, but more weight means more power is needed and more parts break. There is a point of diminishing return when it comes to weight. I can easily make The Beast heavier with items such as aluminum front shock towers and brass links, but I’m in no rush. No more wrenching. It’s time to run this thing.

The first test session for The Beast was my backyard course, which offers a variety of Top Truck Challenge type obstacles. It doesn’t exactly drive like a belly dragging comp crawler, I can tell you that. More like a tank, this rig moves what it can’t climb over. It lives up to its name in everything it does. Despite its mass, it powers right up hills and can cruise over rock gardens. But, ultimately, What it can’t finesse, it bulldozes.
One section of my course consists of multiple tall stakes you have to navigate and squeeze through. It’s part maze and part slalom course. Wide stance and all, The Beast weaved its way through thanks to a lot of 4-wheel steer use. A smaller rig will definitely make faster work of this section, but the 4-wheel steer (and dig) allowed this bigger truck to go places it you’d think it doesn’t fit.
After my initial run, the next test for The Beast was an oganized truck pull with a weight transfer sled. As you’d expect, a heavy truck with a 3S battery and a decent amount of Kvs, pulls strongly. The Pro-Line tires dug in extremely well. My first pull was an easy full pull. While other trucks were stopped in their tracks, The Beast was one of the few that needed more weight added to the sled. This rig has power.

The Beast might not be my pick for a Sunday trail run and it wouldn’t get the nod for a Class 2 comp. But, when I want an off-roading machine that I can just beat on and hammer through any sort of terrain, The Beast is just the rig for that. With all that Treal aluminum, it’s tough. With the Spektrum DX6 Rugged and Firma 2-in-1 brushless system, it’s as reliable as it is easy to use. The Reefs servos are overkill that fit perfectly with the theme of the vehicle. The Pro-Line tires, inserts, and body make for a great combination of performance and style. And, the Rock Pirates RC bring it all together and add even more durability. The 4-wheel steering might be unexpected on a Base Camp, but it’s an absolute blast. Put all of this together and you have a rig that is nothing other than a beast.